An intermediate switch is used if more than two switches are required to control a two way lighting circuit.
Important - this is for a Retro Touch Intermediate Switch, for other Intermediate Switches see How To Install An Intermediate Switch.
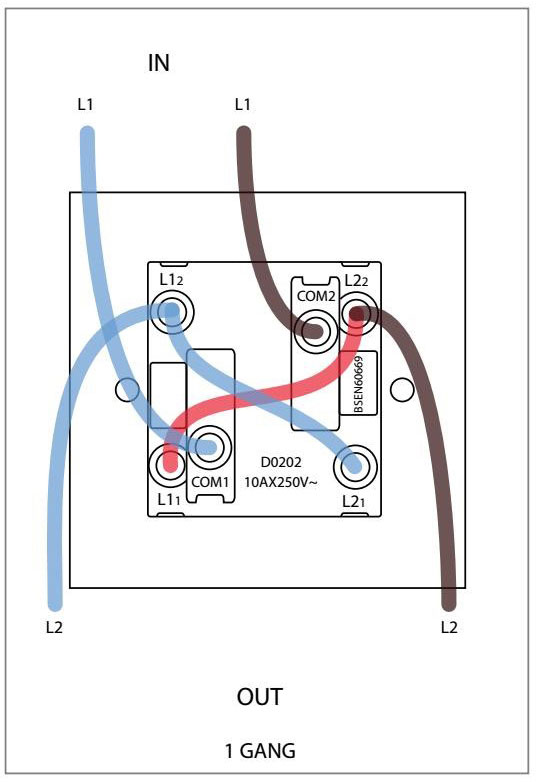
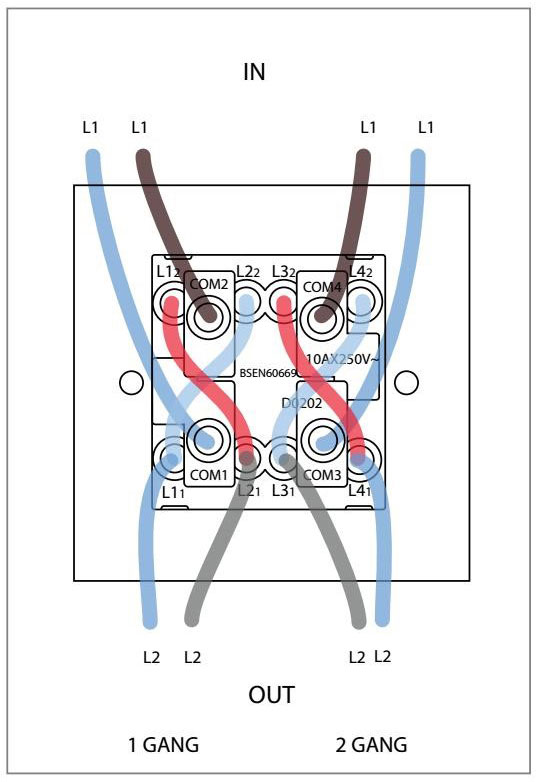
RetroTouch Intermediate Switch Wiring Diagram - 1 Gang
RetroTouch Intermediate Switch Wiring Diagram - 2 Gang
Important
If in any doubt on how to proceed, consult a qualified electrician.
All work carried out should comply with all applicable Wiring Regulations.
Read the instructions carefully before commencing installation. Incorrect installation will invalidate your guarantee.
Metal plate sockets and switches must be correctly earthed.
It should be fitted between the first and the last switches on the circuit.
If replacing an existing switch, note the location of the terminals and the colour and position of cable connections.
The diagram shows the method of wiring a Retro Touch Crystal intermediate switch into a two way light switch circuit.
Intermediate switches can be used for 1 and 2 way switching.
Please Note
- Always ensure that the mains supply has been suitably isolated before commencing installation.
- Remove the existing socket or switch from the wall (if replacing).
- Remove any plaster debris and dust from the inside of the wall box.
- Always use the correct type of cable that is rated appropriately.
- The terminal layout may vary from one socket or switch to another, therefore carefully check the location of the terminal connections before wiring.
- For sockets and switches supplied with a clear plastic gasket, position it between the wall and the accessory. This gasket must therefore be placed over the wires before they are connected to the accessory.
- Connect the new socket or switch as shown in the appropriate wiring diagram in these fitting instructions taking care that only the copper conductor(s) enter the terminals. It is absolutely vital that the terminal screws do not clamp on the insulation of the cables. When using multicoloured (stranded) cables make sure that after the terminals have been tightened, no stray strands are left outside the terminals. If necessary, trim and strip the cable to suit.
- Important: Metal decorative sockets and switches must be correctly earthed. This is achieved by connecting the fixed earth wire to the earth terminal on the socket or switch and then connecting a short length of wire from this terminal to the earth terminal in the wall box. Use appropriate green/yellow sleeving if required.


